Glass Ball Ornament with Insert
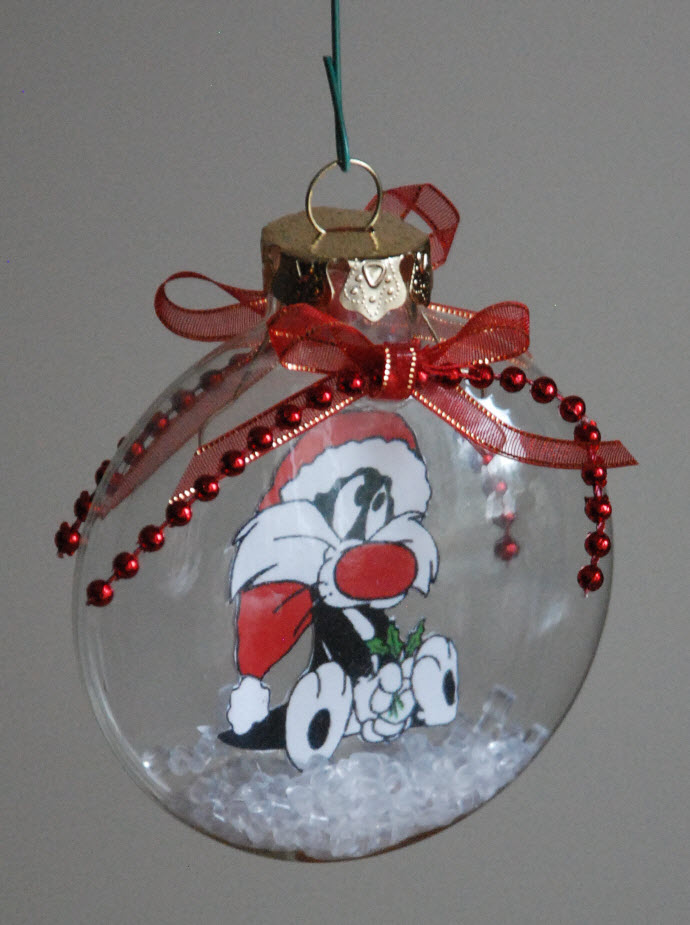
There are lots of ornaments featuring the better known Looney Tunes characters like Bugs, Daffy, and Sylvester, but it can be almost impossible to find any commercial ornaments that include some of the lesser-knowns. One of these is Sylvester Junior, who is one of our absolute favorite characters. Needless to say, I just *had* to add some handmade Sylvester Junior ornaments to my Looney Tunes tree.
This ornament is made from a purchased clear glass ball; the image inside is glued to an insert made out of an overhead transparency sheet (the kind used to make overhead slides). I used the slightly flattened kind of ornament ball, though you could use a full round one if you prefer.
To make the insert, I cut a piece of plain transparency in a circle shape sized to fit snugly, but without buckling, inside my ornament. To prevent the transparency from rotating inside the glass ball, I left a tab on the top just the right size to fit into the neck of the ornament. I sized the image to fit nicely into the center of the ball, leaving plenty of clearance (at least 3/4") all around. Because I wanted the ornament to look good from both sides, I printed the image twice on paper, mirroring the second one so the two images could be mounted back-to-back. Next, I carefully cut out the two pictures and glued them to the transparency with tacky glue, sandwiching the transparency between them and lining them up carefully back-to-back. I placed the image near, but slightly below, the center of the transparency so there's a little space below for the plastic crystals and room above for the bow-and-bead trim.
Once the glued image was thoroughly dry (I left it overnight to be sure), I inserted the transparency assembly into the glass ball. To do this, remove the ornament cap and carefully roll up the transparency just enough to slide it in through the neck of the ornament. Take some care with this as you don't want the image to come unglued. Once the insert is in place inside with the tab sticking up into the neck of the glass ball, allow it to unfurl -- it should spring open and fit nicely inside the glass, and should look as though the figure is suspended in mid-air.
To fill in the bottom I added small plastic "ice crystals"; the ones I used were from a dollar store, where they are sold as vase filler. I replaced the cap and finished off the whole thing with two small bow/bead decorations that I made from ribbon and fused bead trim. These were glued in place with tacky glue.
I really like the impression of the image "floating" inside the glass ball. If you prefer, you can print your image directly on the transparency using a fairly dark color saturation -- this gives a kind of translucent effect that can be quite nice for photographs. However, I found that I didn't like the look of the cartoon image done this way, so I opted for this method of gluing the paper images onto the transparency instead.
Not just for Looney Tunes . . .
As with the other ornaments on the site, you can make these glass ornaments featuring just about any theme.
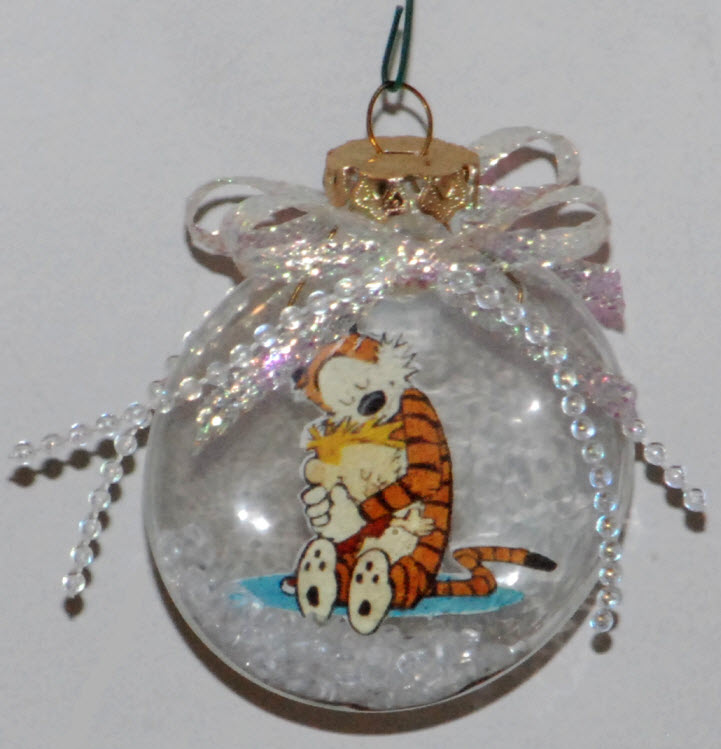
Although the Calvin and Hobbes ornament at right is made in identical fashion to the Sylvester Junior one above, the blue and tawny orange colors in the image and the translucent bead-and-ribbon trim give it quite a different look from the brighter reds in the Sylvester Junior version.
The final example shows a slightly different treatment: the image is a photograph printed directly on the transparency slide, then cut to fit the glass ball. Because the image isn't solid, the ornament has a dreamy, translucent effect as the tree lights shine through it. (This photo was taken before I had finished the ornament off with bow and bead trim.)

Almost any image -- whether it's a photo or a line drawing -- can make an interesting ornament. You could try family photos, Christmas motifs, super hero symbols, Hogwarts crests, geocaching symbols, or beloved characters.