
Felt Mini Stocking Ornament
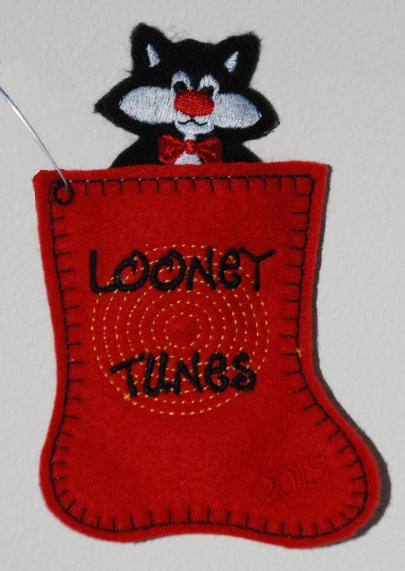

This little stocking is approximately 3.7" tall and about 3" wide across the toe. The tuxedo cat toy isn't exactly Sylvester, but he's close enough to earn a spot on my Looney Tunes tree. I made the one in the picture using my embroidery machine, but you can duplicate this ornament with hand or machine stitching using the patterns and instructions below. They are used with permission.
To make the stocking by hand:
Trace around the pattern (given at bottom of the page) twice on red felt, remembering to reverse the second piece, and cut them both out.
Start by stitching the concentric circle motif using doubled yellow thread and a small hand running stitch. Then hand-sew a blanket stitch along the top of the stocking front with black embroidery thread. If you wish, you can also blanket stitch along the top of the stocking back. If you would like to embroider the lettering by hand, you can do that now.
Place the two stocking shapes together, wrong sides facing. Blanket stitch by hand all around the edge, leaving open along the top of the sock.
If you haven't already added lettering, write the words "LOONEY TUNES" or "PUDDY TAT"using dimensional paint and allow it to dry. To hang the completed stocking, poke a hole in the top corner of the stocking and apply a small eyelet. A Christmas hook or string can be threaded through the hole for hanging.
To make the stocking with a sewing machine:
Trace around the pattern only once on red felt to make the stocking front; cut out. Stitch the concentric circle motif first; if you don't feel confident enough to do this by machine, you can use a small hand running stitch. If you are adding machine- or hand- embroidered lettering, do that now. Place the stocking front right side up onto an uncut piece of red felt and stitch around the edge about 1/8" inside the edge of the stocking front; a machine blanket stitch is nice if you have it, but you can use a regular zigzag or even straight stitch if you don't. Leave the sock open along the top edge. Trim the stocking back around the edge just outside the stitching, leaving a narrow felt border all around.
If you have not already added lettering using the sewing machine, write either "LOONEY TUNES" or "PUDDY TAT" using dimensional paint and allow it to dry. To hang the completed stocking, poke a hole in the top corner of the stocking and apply a small eyelet. A Christmas hook or string can be threaded through the hole for hanging.
To make the little cat toy:
The little tuxedo cat toy is about 2" wide and 3.3" tall -- just the right size to fit into the 3.7" sock. The toy in the picture was made on the embroidery machine, but it looks just as nice when you applique the features by hand or using a conventional sewing machine.
Trace the body piece once onto black felt, but don't cut it out yet. Then trace and cut the white face and belly from felt and attach them in position on the toy front, as indicated on the pattern. If you like, you can simply glue them in place with tacky glue, but if you prefer the finished look of stitched applique (I do), you should also stitch them in place along the edges, either by hand or machine. For the nose and bowtie, you can applique them using red felt, or if you prefer, you could substitute a red pompom for his nose and make his bowtie out of red ribbon -- if so, add these to the finished toy after it is stuffed.
Once the face and belly are appliqued in position, use black thread to make the mouth. Then place the still-uncut front body piece face up on top of a second, uncut piece of black felt. With black thread, machine stitch all around the body just inside the traced outline, leaving opening between his ears. Work slowly and carefully, either by hand or using a small stitch setting on your machine. Take special care around the inside of the legs.
Once the stitching is complete, trim carefully around the edge of the body, leaving a border about 1/8" except between the ears, where you should leave at least 1/2". Cut a single snip to separate the legs, being careful not to cut through your stitching.
Stuff him lightly with polyester fiber, filling arms and legs carefully with teeny bits of stuffing at a time. Use just enough to pad him out a bit; he doesn't need to be stuffed firmly. Sew the opening closed by hand or machine, then trim the edge between the ears. For his pupils, add small black dots using dimensional fabric paint. If you are using a pompom nose and ribbon bow, add those now.
When the paint on the eyes has dried, tuck the Sylvester toy inside the stocking and hang it on the tree.
If you prefer to stitch your Sylvester toy by hand, cut out the body pieces first and sew them together, wrong sides facing, using an overcast or blanket stitch and beginning the top of his head. Stuff him lightly before closing up the stitching at the top of the head, then finish as described.
See below for the patterns
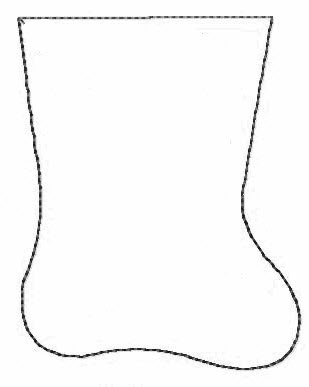
The pattern for the mini stocking. Print your pattern to approximately 3" wide x 3.7" tall. Trace the pattern onto felt, then sew the pieces together about 1/8" inside the trace line, leaving top open. After sewing, trim around the stitching line leaving a border of about 1/8".
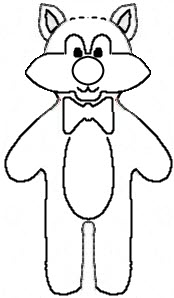
The pattern for the tuxedo cat toy. Print the pattern approximately 2" wide x 3.3" tall. Trace it onto felt, apply the appliqued pieces, then sew the front and back together, leaving open between ears for stuffing. Stuff lightly, then close the opening with hand or machine stitching. After sewing, trim around the stitching line leaving a border of about 1/8".
Note: If you prefer to make a mini stocking ornament using your embroidery machine, you can find a selection of mini stocking designs at this link. Patterns used with permission.