Mini VintageTV Ornament
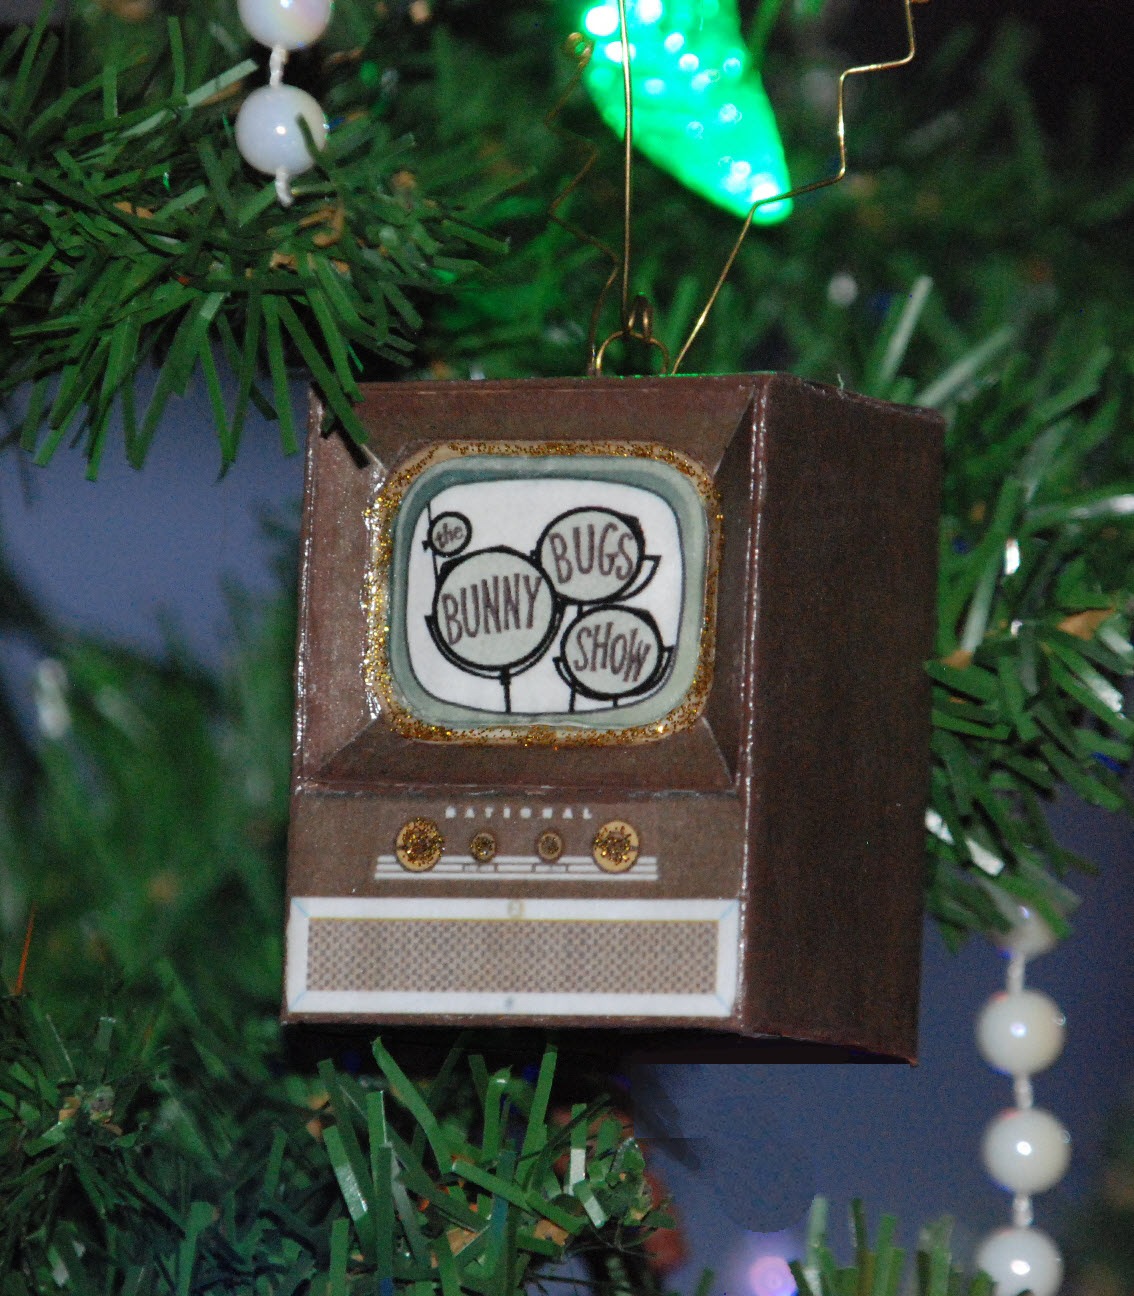
The mini TV ornament is essentially a box shape that is printed and made up from card stock. I like the vintage look of this TV -- in fact, it was on a TV almost exactly like this that I first saw Looney Tunes.
To make the TV, I used the template that appears at the very bottom of the page. To download the template, right click on the image and save it to your computer. You may be able to size and print it from your imaging software, but if not, you can certainly size it in Word. Just import the image and set the size to 6.5" wide, then print. This produces an ornament about 2.5" high, not including the rabbit ears. I printed my TV directly on 110-lb card stock, but if you don't have any handy, you can print on ordinary paper and then glue the printed image to some lightweight cardboard -- a manila folder or light cereal box cardboard is perfect, and in fact gives a bit of extra heft to what is otherwise a pretty light ornament.
The template below doesn't have an image on the screen, but you can use pretty much any picture you happen to have on hand or find a suitable one on line; the TV ornament can also be used with family photos, rubber stamp pictures, Christmas card images, or wrapping paper if you like. (I inserted my image prior to printing, right in my software. Further down the page, I'll discuss how to add an image after printing.)
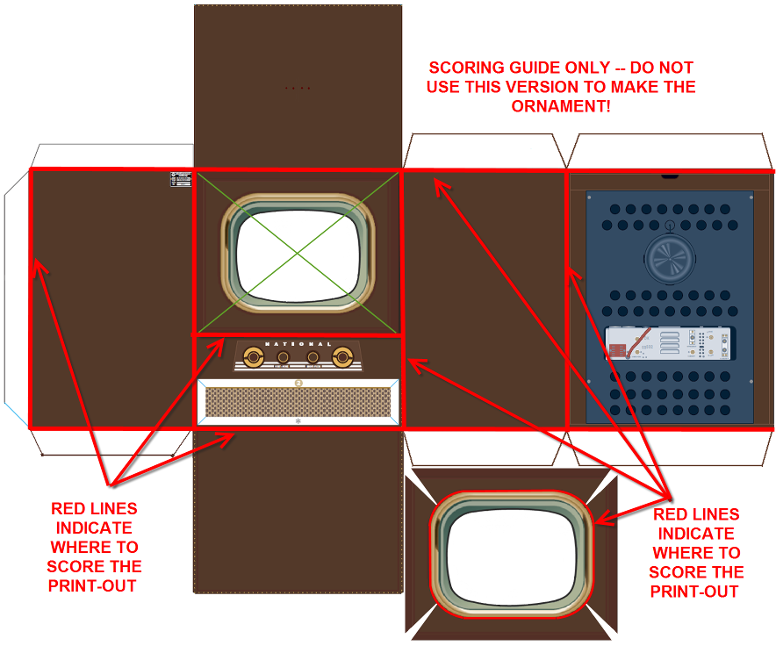
Once the template has been printed or mounted on card stock, but before the pieces are cut out, use a stylus to score along all the foldlines in both the basic TV console and the screen insert. (Follow the red guidelines indicated on the scoring guide; you need not score along the green criss-crossed lines on the front of the TV console itself. Use a straightedge to help you score the straight lines accurately). After scoring, carefully cut out the TV and the screen insert; I like to use scissors for cutting but if you feel you get a more precise cut with a craft knife you can certainly use one of those. Then pre-fold along all of the scored lines.
To assemble the TV console, use a toothpick to spread a thin layer of tacky glue on the back/side fold, and glue it inside the back edge of the TV. Press firmly til the glue grabs. Then spread glue on the bottom tabs and glue the bottom of the TV into place, matching the edges carefully. You will now have a small box with an open top. Don't glue the top yet.
You will notice four dots on the top of the TV; these show the position of the hanging loop and optional rabbit ear antennas -- the two middle ones are for the hanging loop and the outer two are for the antennas. Use a sewing needle to poke holes at the dots; if you are not adding the rabbit ears, you can just punch the inner dots and ignore the outer dots.
You can make a small wire loop to take an ornament hook, or you can insert some string to hang your ornament. To make the wire hanging loop, cut a piece of wire about 1.5" long (or, alternatively, a string about 4-5" long). Bend the wire in half around a small dowel or knitting needle, to make a nice curved loop. Then, working from the right (printed) side of the TV, push the ends of the wire through the two middle needle holes and bend the ends of the wire flat against the inside top of the TV. Work carefully during this process so as not to distort the cardboard top too much. Hold the wire ends in place on the inside with a piece of tape or a dab of tacky glue.
If you are using a string for hanging instead, cut it about 6" long and push the ends through the holes from the right side, securing them with a knot on the inside. A dot of glue or a piece of tape will help to keep the string in position.
If you are inserting the optional rabbit ears, you will need another piece of wire, approximately 5-6" long. In the example, I have used 18 gauge brass-plated aluminum craft wire.
Working from the wrong side (inside) of the TV top, push the ends of the wire through the outer two holes so that they stick up on the outside of the TV top. Push the wire all the way up and tape it in position on the inside, taking care not to distort the cardboard top of the TV.
On the outside, bend the wires in a zig-zag. Trim them with wire cutters if they are too long and finish the ends by making a small loop with your round-nosed pliers. Refer to the photo at right as a guide.

When the hanging loop/string and antennas are in position, spread a thin layer of tacky glue on the top tabs and glue the top of the TV into place, matching the edges carefully. The TV box is complete, and all that remains is to add the screen insert, which is indented slightly just as the screens on old TVs used to be.
To make the screen insert, you will first need to add your image into the blank area. There are three ways to do this. First, you can use your imaging software to place an image into the blank area before printing and cutting out; this is the method I used. If you are adding the image after printing, you can cut an image to the right size and simply glue it in position on top of the blank screen area. Or, as an alternative, you can create an opening and paste your image behind it. Cut away the blank section of the screen to form the opening, then cut your chosen image just slightly larger than the opening, and glue it in position so the picture shows through the opening.
Once you have an image in place, you can install the screen insert into the TV. This process is not exactly difficult, but it is a little fiddly. First, use a craft knife to cut an "X" in the TV front, along the green criss-crossed lines on the template. Then push the resulting triangular flaps slightly to the inside; they will fold nicely along the scored lines. Using a toothpick, spread a thin layer of glue on these flaps. Push the pre-folded insert into the opening so that the corners meet and the edges are flush with the outside of the TV.
Once the glue has dried, you may want to give the ornament a very light coat of podgy or spray fixative, just to fix the images and to provide a bit of shine. If you like, you can add a tiny bit of gold glitter glue around the screen border and on the knobs.
A TV ornament is particularly suited to the Looney Tunes theme, since most of us came to know the Looney Tunes gang from a TV show. But this ornament can also display any kind of picture, from cartoon images to comic book heroes, from graduation or wedding photos to baby pictures to pet pictures or images of famous people. If you prefer a more contemporary style of TV for your ornament, you can find one by searching "paper toys TV" or "doll house printables TV" on the Internet.
TV Ornament Template
Print the template below at 6.5" wide to make a finished ornament of about 2.5" high.
Above is the template for printing; the version below is a scoring guide. Score the printed ornament along all the lines shown in red on the guide.