
3-D Diorama Style Ornament
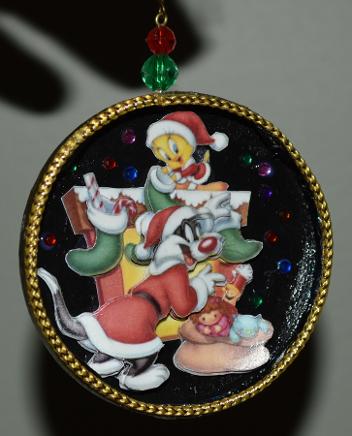
You might already have guessed that this ornament is made from a metal jar lid! Mine's about 3" wide, and the recess on the lid gives a definite inside/outside -- perfect for a shallow diorama effect.
Before I started to assemble the ornament, I poked a tiny hole in the top rim using a nail. Using my round-nosed pliers, I made a small loop in one end of a 2" length of craft wire, then ran it up through the hole and added a couple of beads on top. I trimmed the wire about 1/2" -3/8" and used the pliers to make a second loop for hanging.
The inside and outside of the ornament have been given different treatments. The 3-D diorama effect on the inside/front (shown at left, above) is made using a simplified paper tole technique using three layers of a single image, printed on cardstock. (There are some very good basic paper tole instructions here). Of course, if you'd rather not make your own paper tole, you could use one of the lovely 3-D motifs that are made for scrapbooking -- they have just enough depth to give a nice relief and most will fit perfectly inside a 3" lid.
PAPER TOLE LAYERS for the image I used
Layer 1: Entire image
Layer 2: Cat Santa, stockings, and Santa sack
Layer 3: Cat Santa only
I lined the inside of my lid with a piece of black paper so that my paper tole motif would visually "pop." I finished the lining with a light coat of podgy and set it aside to dry. Then I cut out the motifs and made the paper tole (using an acrylic caulk for the glue). When the paper tole motif was completely dry, I glued the whole assembly to the inside of the jar lid, making sure to position the image so the beaded hanger is at the top of the ornament.
Once the paper tole was in place and the glue had dried, I gave the inside of the ornament a coat of podgy for shine and durability. (I would skip the podgy if I were using a purchased scrapbooking motif -- it likely would not need the extra finish). When that was dry, I finished off the inside with a bit of iridescent glitter glue trim around the inside edge, and glued on a few star sequins for extra sparkle. Then I set the ornament aside to dry completely before finishing the back.
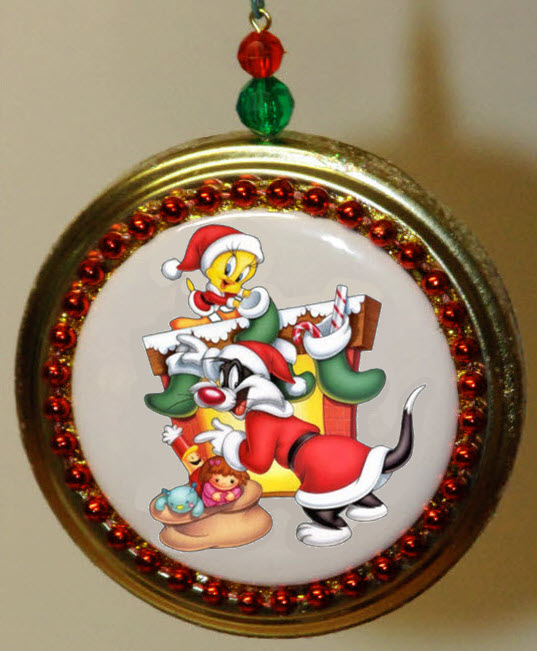
The outside of my lid was already plain gold color, so I didn't have to paint it, but I also didn't want to leave it blank. I made the convex "cameo" effect on the back of the ornament (shown at right, above) using a 2.25" button-badge glued in place with GOOP (remove the pinback first) and surrounded by fused-bead trim. I like the slightly convex appearance of the button, but the ornament would also look nice if you simply decoupaged a flat image to the back. The final step was to glue some gold braid around the outside lip of the lid.
For this ornament, I used the same image on the back as I used for the paper tole on the inside, but you don't have to use the same picture on front and back -- any pair of coordinating images would do (for example, a map of your vacation spot on the flat back and a scrapbooking travel motif on the inside; or a picture of Santa on the back and a scrapbooking motif of his suit on the inside; or a picture of your craft room on the back and a suitable crafty motif on the inside; or an image of Hogwarts on the back and a magical motif on the inside).